Have you recently purchased a light bar for your jeep or SUV? If so, congratulations! A quality light bar is a critical piece of equipment, particularly when you are driving at night or want to go off-roading! Now that you have made the investment, you need to make sure you install it correctly.
Below, we are sharing some tips for installing your new light bar. Rest assured, this is usually a simple process, made even easier because LED light bars are relatively lightweight. You should be able to install your light bar either by yourself or with the assistance of a friend.
First, check your light bar package and ensure that you have all the pieces. You don’t want to begin only to learn you are missing that last critical component because of a packaging error.
Once you have laid out all the parts, make sure you have, on hand, the appropriate tools for the job. While simple to install and wire, you do need to have some basic items. For installation, you need wrenches, pliers, and screwdrivers, as well as a measuring tape. You may also want to have some clamps on hand to hold the bar still when determining where to drill holes.
When you are ready to wire you will use wire strippers and cutters as well as crimpers. Make sure they match your connectors. You may also need tape and caulking as well as wire ties.
Test Your Light Bar before installing!
Before you actually begin the installation, test your lightbar and ensure it works. You can do this by connecting it to your car’s battery. If it doesn’t work, you can do an exchange before you waste time installing something broken.
Some important tips for the actual wiring start with a relay. Generally, they can handle a higher load than switches so they won’t overheat. Their voltage drop is less and, when used with a single control switch, you can use lights simultaneously.
For some inexpensive protection for your vehicle’s electrical system, we also suggest the use of a fuse with the right amp rating. Benjamin Franklin once said, “An ounce of prevention is worth a pound of cure.” And nobody knew electricity like he did.
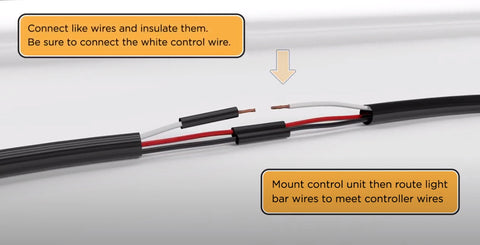
Step 1: Mount control unit then route light bar wires to meet the controller wires.

step 2: Light Bar Controller Unit
controller unit should be located in a suitable spot with an unobstructed view of the rf remote the switch wire can be routed through the firewall to switch location inside cab.

Step 3: Wire Switch Cable inside Cab of your vehicle

Wire the switch cable inside the cab of your vehicle. Many people cut a small hole somewhere in reach of the driver using a drill or a Dremel and insert the button inside.
Also, ensure the inline fuse is installed and not broken.
Step 4: Connect the negative then positive wire to the battery

Special Notes:
If you have an aftermarket switching system, cut off the two toggle switch wires and splice them together. Then you can connect the positive battery wire from the harness to your switching system
If the remote doesn't work. Pull in-line ruse to reset the control module. Once you've downloaded and opened the app. Select led dmx and it should connect automatically.
